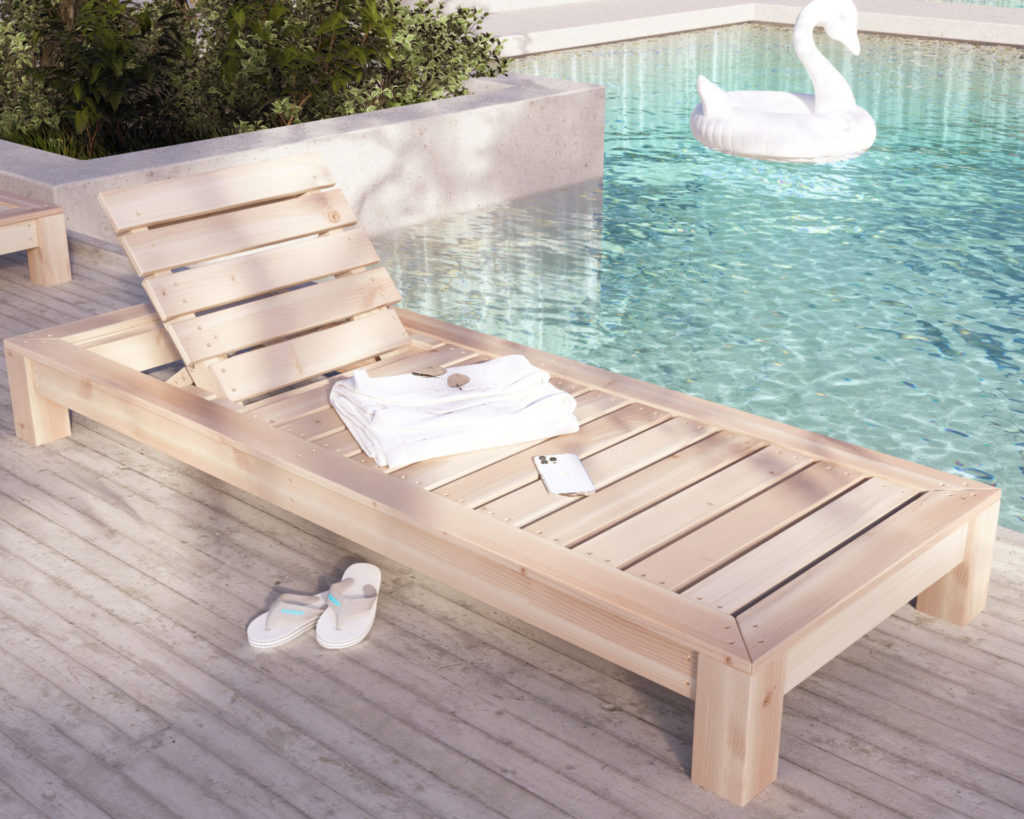
Hey there, DIY enthusiasts! Are you tired of those flimsy plastic lounge chairs that crack in the sun and leave you feeling like you're sinking into a puddle of sweat? Want something more substantial, something that whispers "relaxation" and "summer days" just by looking at it? Well, buckle up, because today we're building a wooden chaise lounge that'll be the envy of your neighborhood.
Don't let the idea of woodworking intimidate you. This project is actually pretty straightforward, and the satisfaction of creating something beautiful and functional with your own two hands is worth the effort. Trust me, the feeling of lounging on your own handmade creation under a sunny sky will make all the work feel like a distant memory.
### Gathering Your Supplies:
Before we dive into the build, let's make sure you've got everything you need. This is not a trip to the hardware store you want to make on a whim. We're talking about a chaise lounge here, folks, so we need the right stuff to make it sturdy and durable:
Lumber: You'll need about 8 feet of 2x4 lumber for the frame, and another 4 feet of 1x12 lumber for the slats. Choose pressure-treated lumber for extra longevity, especially if you plan on leaving it outdoors year-round.
Screws: You'll need a variety of lengths. 2-inch and 2.5-inch screws will be perfect for the frame, while 1-inch screws will hold the slats in place. Go for outdoor-rated screws for maximum resistance to the elements.
Wood Glue: A good quality wood glue will add strength and longevity to your joints.
Wood Stain or Paint: This is your chance to add a personal touch! Choose a color that compliments your outdoor space, or go for a natural wood finish for a rustic look.
Sandpaper: A variety of grits will help smooth out rough edges and prepare the wood for staining or painting.
Safety Glasses: Protect your eyes! You'll be working with wood and power tools.
Gloves: Work gloves will protect your hands from splinters and keep them clean.
Tape Measure: This is crucial for accurate measurements and precise cuts.
Saw: A circular saw or miter saw will make cutting the lumber a breeze.
Drill: A drill with a variety of drill bits is essential for creating pilot holes and driving in screws.
Level: This will ensure your chaise lounge is nice and stable.
Clamps: These will help hold the frame together while you secure it with screws.
Alright, got all that? Let's get started!
### Constructing the Chaise Lounge Frame:
1. Cut the Lumber: The first step is to cut your lumber to size. Refer to the plans you've chosen (or create your own!), but here's a general idea:
Legs: Four pieces of 2x4 lumber, about 16 inches each.
Long Rails: Two pieces of 2x4 lumber, around 48 inches each.
Short Rails: Two pieces of 2x4 lumber, around 20 inches each.
Slats: Eight pieces of 1x12 lumber, around 20 inches each.
2. Assemble the Base: Now, lay out the legs so that they form a rectangle with the long rails. Use wood glue and screws to attach the long rails to the legs. Make sure everything is square and level using your tape measure and level. You can use clamps to hold the pieces in place while you drive in the screws.
3. Attach the Short Rails: Position the short rails about 10-12 inches from each end of the long rails. You want the short rails to be parallel to the long rails. Attach them to the legs using glue and screws.
4. Add Support Braces: For extra stability, you can add a couple of support braces between the long rails. These should be cut to fit diagonally across the frame, and attached with glue and screws.
5. Finishing Touches: Before moving on to the slats, take a moment to smooth out any rough edges with sandpaper. This will ensure a more comfortable and aesthetically pleasing finished product.
### Creating the Comfortable Seat:
Now it's time to turn that frame into a lounging paradise!
1. Cut the Slats: Measure the distance between the short rails, and cut your 1x12 slats to that length. Aim for a spacing of about 1 inch between each slat.
2. Attach the Slats: Using wood glue and screws, attach the slats to the frame, starting from one end and working your way across. Make sure the slats are evenly spaced, and that the screws are driven in at a slight angle for extra strength.
3. Final Refinement: Once the slats are in place, use sandpaper to smooth out any rough edges.
### The Grand Finale: Finishing and Enjoying!
You're almost there! This is where you add the finishing touches to your masterpiece.
1. Sanding: Sand the entire chaise lounge with fine-grit sandpaper. This will create a smooth surface that's ready for staining or painting.
2. Staining or Painting: Now it's time to unleash your creativity! If you're going for a natural wood finish, apply a wood stain according to the manufacturer's instructions. If you want a bolder look, paint the chaise lounge with your chosen color.
3. Sealing: Once the stain or paint has dried completely, apply a sealant. This will protect the wood from the elements and keep your chaise lounge looking its best for years to come.
4. Relax and Enjoy: Congratulations, my friend! You've just built your very own, one-of-a-kind chaise lounge. Find a sunny spot in your garden, add a comfy cushion, and prepare to soak up the summer rays in style.
### Tips for Success:
Safety First: Always wear safety glasses and gloves when working with wood and power tools.
Measure Twice, Cut Once: Accuracy is key when working with lumber. Double-check your measurements before cutting to ensure everything fits perfectly.
Use the Right Tools: The right tools will make the job easier and safer. Don't try to use a screwdriver when a drill will do the job in seconds!
Don't Be Afraid to Ask for Help: If you're unsure about a particular step, don't hesitate to ask a friend or family member for help.
Enjoy the Process: Building something with your own hands is a rewarding experience. Take your time, enjoy the process, and be proud of your creation!
Remember, this is just a guide. Feel free to customize your chaise lounge with unique features, like armrests, a footrest, or even a built-in drink holder. Let your imagination run wild and create a lounging experience that's uniquely yours. Happy building!
0 comments:
Post a Comment
Note: Only a member of this blog may post a comment.